Step-by-Step Integration
This guide walks you through the complete process of setting up your system with fiskaly SIGN DE, using a combination of the fiskaly HUB, the Management API, and the SIGN DE API. By the end, you will have a fully provisioned managed organization with a TSS and client ready to sign transactions.
Before diving into the setup, here is what you will configure:
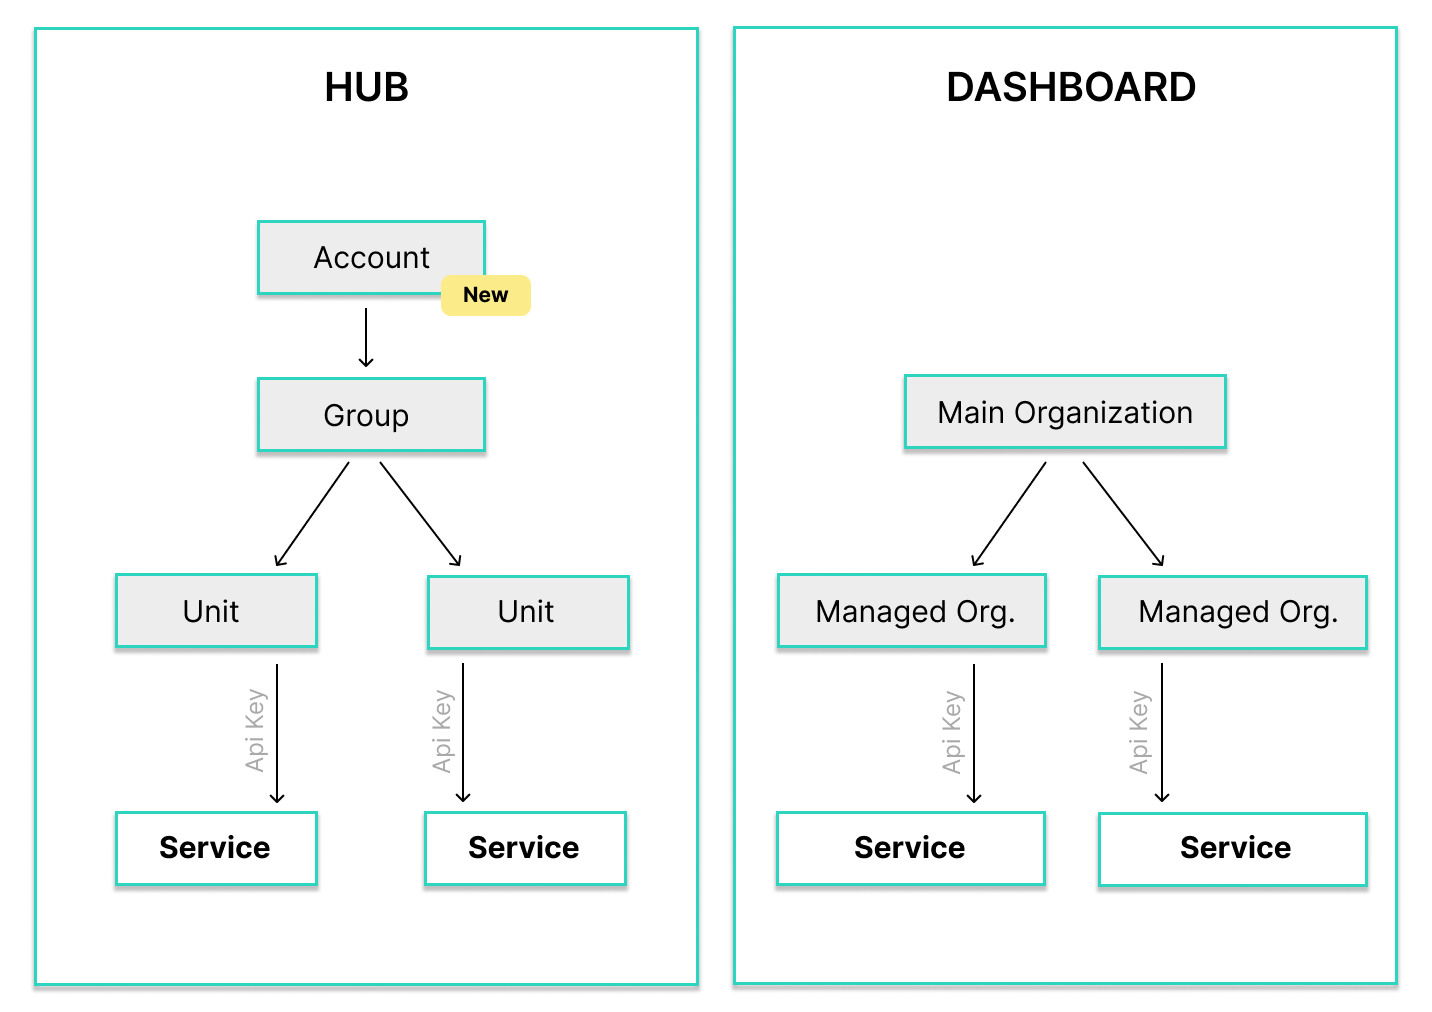
Account & Group
Your Account is the top-level entity created when you register on HUB — it represents your company as a POS provider or retailer. A Group is an intermediate layer within the Account used to cluster managed organizations logically (e.g. one Group per country).
API Key & Token
Credentials generated in HUB and tokens obtained from the Management API and SIGN DE, used to authenticate all subsequent requests.
Managed Organization
Represents a single physical location (e.g. a store or restaurant), called a Unit in the HUB. Created via the Management API and linked to a Group within your Account.
TSS (Technical Security System)
The core signing component. Must be created, configured with an Admin PIN, and initialized before it can sign transactions.
Client
Represents a point-of-sale terminal or application that creates transactions against a TSS.
Transaction
A signed fiscal record. Once your TSS and Client are ready, you can start and finish transactions to generate cryptographic signatures.
Prerequisites
Section titled “Prerequisites”You need a fiskaly account and access to the fiskaly HUB. If you do not have an account yet, sign up here. You will also need a tool to make HTTP requests — for example cURL, Postman, or your own application code.
Integration Workflow
Section titled “Integration Workflow”The diagram below shows all ten steps of the SIGN DE integration. Click any tile to jump to the corresponding setup step.
Step-by-Step Setup
Section titled “Step-by-Step Setup”Register on HUB
Go to hub.fiskaly.com and create your fiskaly account. You will receive a confirmation email — click the link to verify your address and activate your account.
Create Account & Group
When you log into HUB for the first time, you are prompted to set up your Account — the top-level entity that represents your company (POS provider or retailer). HUB will also guide you to create a Group, which is an intermediate layer within your Account used to cluster managed organizations logically (for example, one Group per country).
 💡Not ready for production?
For testing purposes, you do not need to fill in all fields. You can leave the billing address empty and complete it later.
After completing the setup, HUB will show your current overview — initially with 0 TSS and 0 clients.
Create API Key
Navigate to the API Keys section in fiskaly HUB and create a new API key for your Account.
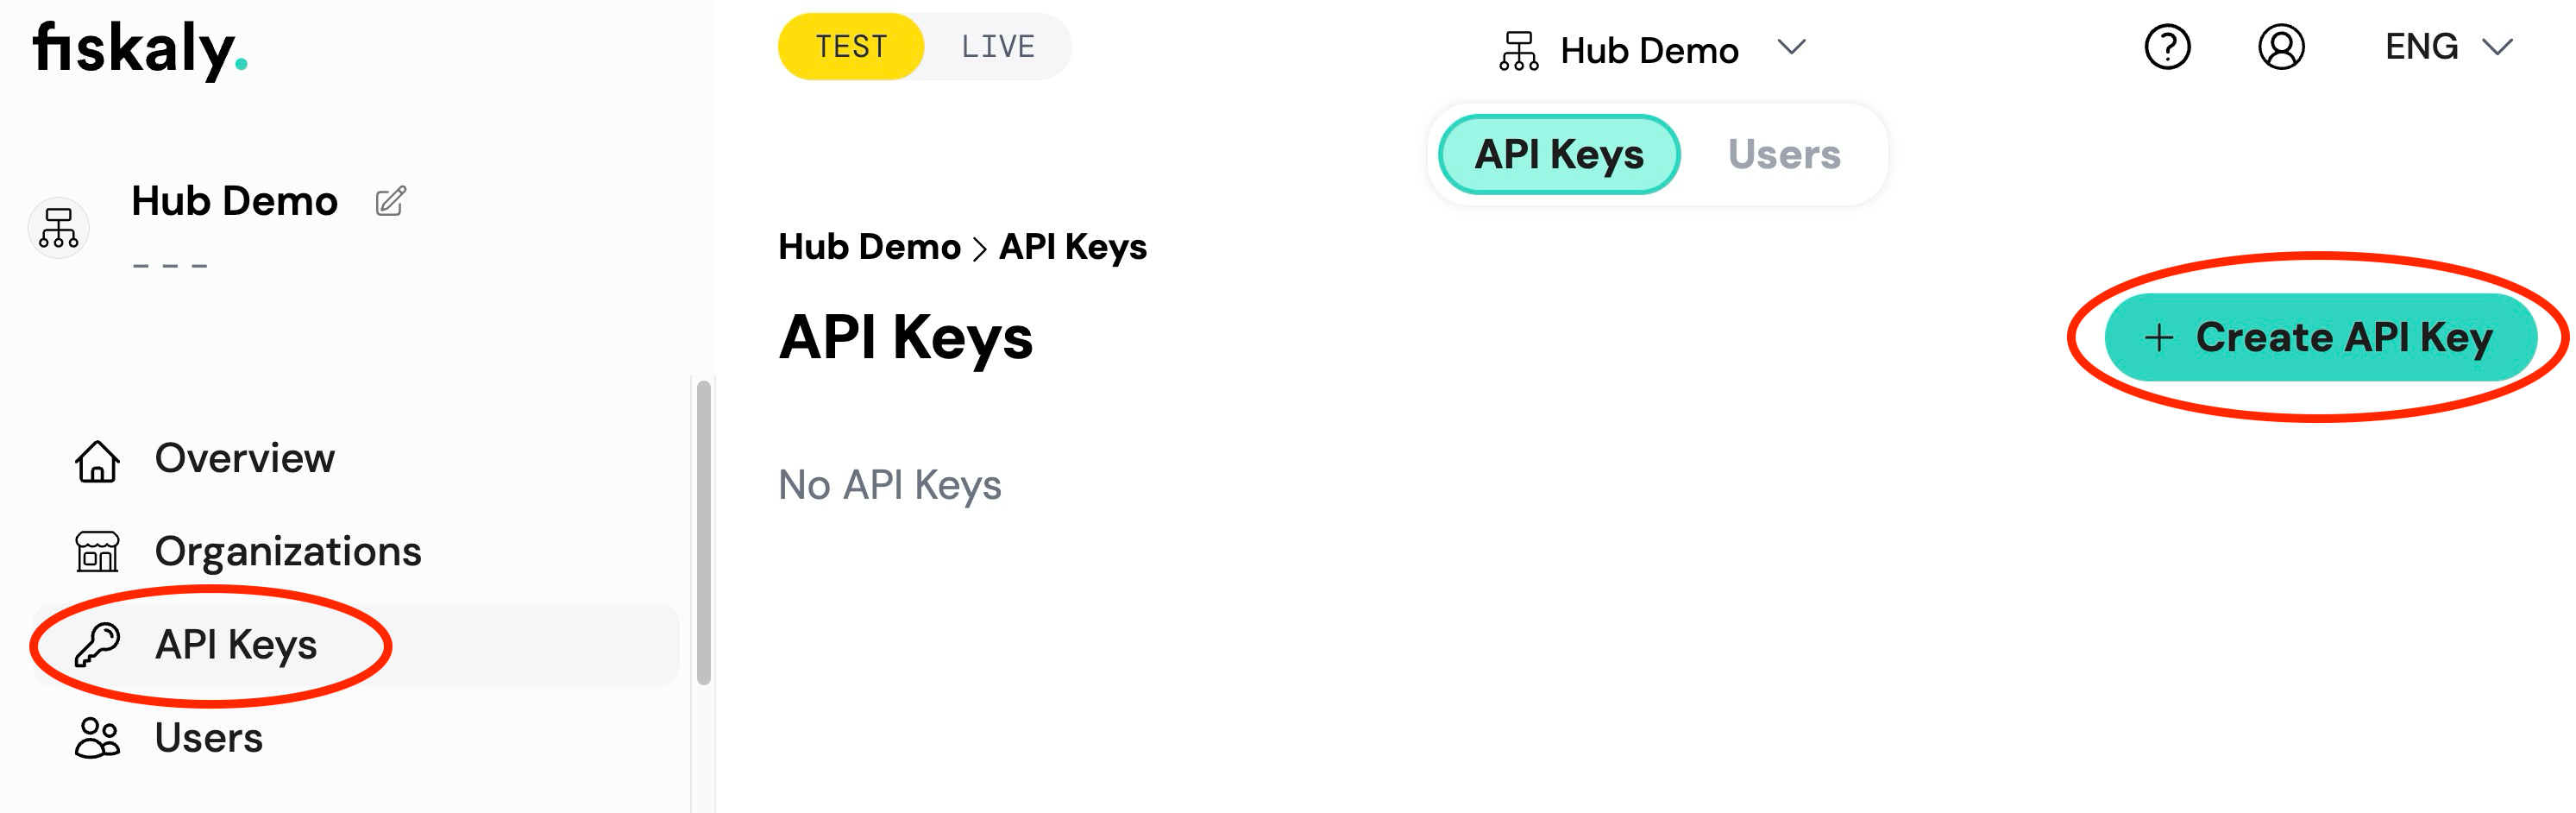
You will receive an API Key and API Secret. Save these securely — you will need them for all subsequent API requests.
⚠️Store your credentials safelyThe API Secret is only shown once. Make sure to copy and store it in a secure location before closing the dialog.
Create Token (Management API)
Use the API Key and Secret from the previous step to obtain a Management API access token.
curl -X POST https://dashboard.fiskaly.com/api/v0/auth \
  -H "Content-Type: application/json" \
  -d '{
    "api_key": "your_api_key",
    "api_secret": "your_api_secret"
  }'
const response = await fetch( "https://dashboard.fiskaly.com/api/v0/auth", { method: "POST", headers: { "Content-Type": "application/json" }, body: JSON.stringify({ api_key: "your_api_key", api_secret: "your_api_secret", }), } ); const { access_token } = await response.json();Example response (200 OK)
{"access_token": "eyJhbGciOiJSUzI1NiIsInR5cCI6IkpXVCJ9...","access_token_claims": {"env": "TEST","organization_id": "00000000-0000-0000-0000-000000000000"},"access_token_expires_in": 300,"access_token_expires_at": 1577833200,"refresh_token": "eyJhbGciOiJSUzI1NiIsInR5cCI6IkpXVCJ9...","refresh_token_expires_in": 300,"refresh_token_expires_at": 1577833200}Use the
access_tokenas a Bearer token in theAuthorizationheader for all Management API requests.Create managed organization(s)
Create one or more managed organizations (also called Units in the HUB) under your Group. Each Unit typically represents a single physical location such as a store or restaurant.
curl -X POST "https://dashboard.fiskaly.com/api/v0/organizations" \
  -H "Authorization: Bearer ${MANAGEMENT_TOKEN}" \
  -H "Content-Type: application/json" \
  -d '{
    "name": "My Store Berlin",
    "managed_by_organization_id": "your-group-id",
    "address_line1": "Unter den Linden 1",
    "zip": "10117",
    "town": "Berlin",
    "country_code": "DEU"
  }'
const response = await fetch( "https://dashboard.fiskaly.com/api/v0/organizations", { method: "POST", headers: { "Authorization": `Bearer ${managementToken}`, "Content-Type": "application/json", }, body: JSON.stringify({ name: "My Store Berlin", managed_by_organization_id: "your-group-id", address_line1: "Unter den Linden 1", zip: "10117", town: "Berlin", country_code: "DEU", }), } ); const { _id: orgId } = await response.json();Example response (200 OK)
{"_id": "your-managed-org-id","_type": "ORGANIZATION","name": "My Store Berlin","managed_by_organization_id": "your-group-id","address_line1": "Unter den Linden 1","zip": "10117","town": "Berlin","country_code": "DEU","state": "active","time_creation": "2026-03-01T10:00:00Z"}Note the
_idfrom the response — this is your managed organization ID, needed for the next step.💡Where to find your Group IDYour Group ID (
managed_by_organization_id) is visible in the fiskaly HUB under Settings → Organization, or you can retrieve it from theorganization_idfield in the Management API token response (POST /api/v0/auth).Create API Key (managed organization)
Generate a dedicated API key for the managed organization. This key will be used to authenticate SIGN DE API requests scoped to that organization.
curl -X POST "https://dashboard.fiskaly.com/api/v0/organizations/${ORG_ID}/api-keys" \
  -H "Authorization: Bearer ${MANAGEMENT_TOKEN}" \
  -H "Content-Type: application/json" \
  -d '{
    "name": "sign-de-key",
    "status": "enabled",
    "managed_by_organization_id": "your-group-id"
  }'
const response = await fetch( `https://dashboard.fiskaly.com/api/v0/organizations/${orgId}/api-keys`, { method: "POST", headers: { "Authorization": `Bearer ${managementToken}`, "Content-Type": "application/json", }, body: JSON.stringify({ name: "sign-de-key", status: "enabled", managed_by_organization_id: "your-group-id", }), } ); const { key: apiKey, secret: apiSecret } = await response.json();⚠️Save these credentialsThe
secretfor the managed organization API key is only shown once. Store it securely before proceeding.Example response (200 OK)
{"_id": "your-api-key-id","_type": "MANAGED_API_KEY","_envs": ["TEST"],"name": "sign-de-key","key": "your-api-key","secret": "your-api-secret","status": "enabled","managed_by_organization_id": "your-group-id","created_at": 1577833200}Create Token (SIGN DE)
Use the managed organization’s API key and secret to obtain a SIGN DE access token.
curl -X POST https://kassensichv-middleware.fiskaly.com/api/v2/auth \
  -H "Content-Type: application/json" \
  -d '{
    "api_key": "managed_org_api_key",
    "api_secret": "managed_org_api_secret"
  }'
const response = await fetch( "https://kassensichv-middleware.fiskaly.com/api/v2/auth", { method: "POST", headers: { "Content-Type": "application/json" }, body: JSON.stringify({ api_key: "managed_org_api_key", api_secret: "managed_org_api_secret", }), } ); const { access_token } = await response.json();Example response (200 OK)
{"access_token": "eyJhbGciOiJSUzI1NiIsInR5cCI6IkpXVCJ9...","access_token_claims": {"env": "TESTING","organization_id": "your-managed-org-id"},"access_token_expires_in": 86400,"refresh_token": "eyJhbGciOiJSUzI1NiIsInR5cCI6IkpXVCJ9...","refresh_token_expires_in": 172800}Use this
access_tokenas a Bearer token for all subsequent SIGN DE API requests.Create TSS
Create a new Technical Security System (TSS) by sending a PUT request with a unique TSS ID (UUID). The TSS must then be initialized before it can sign transactions.
TSS_ID=$(uuidgen)

curl -X PUT "https://kassensichv-middleware.fiskaly.com/api/v2/tss/${TSS_ID}" \
  -H "Authorization: Bearer ${ACCESS_TOKEN}" \
  -H "Content-Type: application/json" \
  -d '{"metadata": {}}'
const tssId = crypto.randomUUID(); const response = await fetch( `https://kassensichv-middleware.fiskaly.com/api/v2/tss/${tssId}`, { method: "PUT", headers: { "Authorization": `Bearer ${accessToken}`, "Content-Type": "application/json", }, body: JSON.stringify({ metadata: {} }), } );Example response (200 OK)
{"_id": "your-tss-id","_type": "TSS","_env": "TEST","_version": "2.2.2","admin_puk": "initial-puk-from-creation","state": "CREATED","serial_number": "a1b2c3d4e5f6...","public_key": "MFkwEwYH...","certificate": "-----BEGIN CERTIFICATE-----\n...\n-----END CERTIFICATE-----","signature_algorithm": "ECDSA","signature_timestamp_format": "unixTime","transaction_data_encoding": "UTF-8","max_number_registered_clients": 100,"max_number_active_transactions": 1000,"time_creation": 1577833200,"metadata": {}}⚠️Use a generous timeoutTSS creation and personalization can take up to 30 seconds. Set a request timeout of at least 30 seconds for both calls to avoid premature failures.
After creation, initialize the TSS in four sub-steps:
a) Personalize the TSS
Move the TSS from
CREATEDtoUNINITIALIZEDstate before changing the Admin PIN:curl -X PATCH "https://kassensichv-middleware.fiskaly.com/api/v2/tss/${TSS_ID}" \ -H "Authorization: Bearer ${ACCESS_TOKEN}" \ -H "Content-Type: application/json" \ -d '{"state": "UNINITIALIZED"}'await fetch( `https://kassensichv-middleware.fiskaly.com/api/v2/tss/${tssId}`, { method: "PATCH", headers: { "Authorization": `Bearer ${accessToken}`, "Content-Type": "application/json", }, body: JSON.stringify({ state: "UNINITIALIZED" }), } );b) Change the Admin PIN
The TSS is created in an
UNINITIALIZEDstate. You must set a new Admin PIN using theadmin_pukfrom the creation response.curl -X PATCH "https://kassensichv-middleware.fiskaly.com/api/v2/tss/${TSS_ID}/admin" \ -H "Authorization: Bearer ${ACCESS_TOKEN}" \ -H "Content-Type: application/json" \ -d '{ "admin_puk": "puk-from-creation-response", "new_admin_pin": "your-secure-admin-pin" }'await fetch( `https://kassensichv-middleware.fiskaly.com/api/v2/tss/${tssId}/admin`, { method: "PATCH", headers: { "Authorization": `Bearer ${accessToken}`, "Content-Type": "application/json", }, body: JSON.stringify({ admin_puk: "puk-from-creation-response", new_admin_pin: "your-secure-admin-pin", }), } );c) Authenticate as Admin
curl -X POST "https://kassensichv-middleware.fiskaly.com/api/v2/tss/${TSS_ID}/admin/auth" \
  -H "Authorization: Bearer ${ACCESS_TOKEN}" \
  -H "Content-Type: application/json" \
  -d '{
    "admin_pin": "your-secure-admin-pin"
  }'
await fetch( `https://kassensichv-middleware.fiskaly.com/api/v2/tss/${tssId}/admin/auth`, { method: "POST", headers: { "Authorization": `Bearer ${accessToken}`, "Content-Type": "application/json", }, body: JSON.stringify({ admin_pin: "your-secure-admin-pin" }), } );d) Initialize the TSS
Update the TSS state to
INITIALIZED:curl -X PATCH "https://kassensichv-middleware.fiskaly.com/api/v2/tss/${TSS_ID}" \ -H "Authorization: Bearer ${ACCESS_TOKEN}" \ -H "Content-Type: application/json" \ -d '{ "state": "INITIALIZED" }'await fetch( `https://kassensichv-middleware.fiskaly.com/api/v2/tss/${tssId}`, { method: "PATCH", headers: { "Authorization": `Bearer ${accessToken}`, "Content-Type": "application/json", }, body: JSON.stringify({ state: "INITIALIZED" }), } );Example response (200 OK)
{"_id": "your-tss-id","_type": "TSS","state": "INITIALIZED","certificate": "-----BEGIN CERTIFICATE-----\n...\n-----END CERTIFICATE-----","serial_number": "a1b2c3d4e5f6...","signature_algorithm": "ECDSA","max_number_registered_clients": 100,"max_number_active_transactions": 1000,"time_creation": "2026-03-01T10:00:00Z"}💡Log out the Admin when doneOnce the TSS is initialized, log out the Admin user as a security best practice — required before production use.
curl -X POST "https://kassensichv-middleware.fiskaly.com/api/v2/tss/${TSS_ID}/admin/logout" \
  -H "Authorization: Bearer ${ACCESS_TOKEN}"
await fetch( `https://kassensichv-middleware.fiskaly.com/api/v2/tss/${tssId}/admin/logout`, { method: "POST", headers: { "Authorization": `Bearer ${accessToken}`, }, } );Create Client
With the TSS initialized, create a client that represents your point-of-sale terminal or application.
CLIENT_ID=$(uuidgen)

curl -X PUT "https://kassensichv-middleware.fiskaly.com/api/v2/tss/${TSS_ID}/client/${CLIENT_ID}" \
  -H "Authorization: Bearer ${ACCESS_TOKEN}" \
  -H "Content-Type: application/json" \
  -d '{
    "serial_number": "POS-001"
  }'
const clientId = crypto.randomUUID(); const response = await fetch( `https://kassensichv-middleware.fiskaly.com/api/v2/tss/${tssId}/client/${clientId}`, { method: "PUT", headers: { "Authorization": `Bearer ${accessToken}`, "Content-Type": "application/json", }, body: JSON.stringify({ serial_number: "POS-001" }), } );Example response (200 OK)
{"_id": "your-client-id","_type": "CLIENT","serial_number": "POS-001","state": "REGISTERED","tss_id": "your-tss-id","time_creation": "2026-03-01T10:00:00Z"}⚠️serial_number is permanentThe
serial_numberyou assign to a client cannot be changed after creation. Choose a stable, unique identifier for each POS terminal (e.g. a hardware serial number or a stable UUID you control).💡Automate the setupThis entire provisioning sequence (Steps 1–9) can be integrated into a fully automated workflow. Once implemented, onboarding a new location requires no manual user interaction.
Daily Operations: Create Transaction
Now that your TSS and Client are provisioned, you are ready for daily operations. Transactions follow a two-step lifecycle that maps to the real-world checkout flow:
- Start the transaction (open the checkout) — send only
state: "ACTIVE"andclient_id. No receipt schema is required at this point. - Finish the transaction (after payment is complete) — send the full receipt schema with amounts and payment type to generate the cryptographic signature.
a) Start the transaction
TX_ID=$(uuidgen)

curl -X PUT "https://kassensichv-middleware.fiskaly.com/api/v2/tss/${TSS_ID}/tx/${TX_ID}?tx_revision=1" \
  -H "Authorization: Bearer ${ACCESS_TOKEN}" \
  -H "Content-Type: application/json" \
  -d '{
    "state": "ACTIVE",
    "client_id": "your-client-id"
  }'
const txId = crypto.randomUUID(); const startResponse = await fetch( `https://kassensichv-middleware.fiskaly.com/api/v2/tss/${tssId}/tx/${txId}?tx_revision=1`, { method: "PUT", headers: { "Authorization": `Bearer ${accessToken}`, "Content-Type": "application/json", }, body: JSON.stringify({ state: "ACTIVE", client_id: clientId, }), } );b) Finish the transaction
curl -X PUT "https://kassensichv-middleware.fiskaly.com/api/v2/tss/${TSS_ID}/tx/${TX_ID}?tx_revision=2" \
  -H "Authorization: Bearer ${ACCESS_TOKEN}" \
  -H "Content-Type: application/json" \
  -d '{
    "state": "FINISHED",
    "client_id": "your-client-id",
    "schema": {
      "standard_v1": {
        "receipt": {
          "receipt_type": "RECEIPT",
          "amounts_per_vat_rate": [
            { "vat_rate": "NORMAL", "amount": "10.00" }
          ],
          "amounts_per_payment_type": [
            { "payment_type": "CASH", "amount": "10.00" }
          ]
        }
      }
    }
  }'
const finishResponse = await fetch( `https://kassensichv-middleware.fiskaly.com/api/v2/tss/${tssId}/tx/${txId}?tx_revision=2`, { method: "PUT", headers: { "Authorization": `Bearer ${accessToken}`, "Content-Type": "application/json", }, body: JSON.stringify({ state: "FINISHED", client_id: clientId, schema: { standard_v1: { receipt: { receipt_type: "RECEIPT", amounts_per_vat_rate: [ { vat_rate: "NORMAL", amount: "10.00" }, ], amounts_per_payment_type: [ { payment_type: "CASH", amount: "10.00" }, ], }, }, }, }), } );Example response (200 OK)
{"_id": "your-tx-id","_type": "TRANSACTION","state": "FINISHED","client_id": "your-client-id","tss_id": "your-tss-id","time_start": "2026-03-01T10:00:00Z","time_end": "2026-03-01T10:05:00Z","qr_code_data": "V0;955002-00;Kassenbeleg-V1;...","signature": {"value": "MEUCIQDx...","timestamp": "2026-03-01T10:05:00Z","serial_number": "a1b2c3d4e5f6..."}}The response includes the signed transaction with a
qr_code_datastring for the receipt QR code, and a cryptographicsignaturefrom the TSS.- Start the transaction (open the checkout) — send only
Next Steps
Section titled “Next Steps”SIGN DE API Reference
Full API documentation for the KassenSichV v2 endpoint — all resources, parameters, and responses.
New Customers Guide
Detailed walkthrough of the setup process with Postman collection downloads and video tutorials.
HUB User Manual
Learn how to manage organizations, API keys, and TSS through the fiskaly HUB interface.
QR Code Validation
Understand the QR code data format on your receipts and how to validate signed transactions.
Was this page helpful?