Guide for New Customers
This guide walks you through the complete process of setting up your system with fiskaly SIGN DE, using a combination of the fiskaly HUB and API requests. By the end, you will have a fully working TSS with a client ready to sign transactions.
Overview
Section titled “Overview”Before diving into the setup, here is what you will configure:
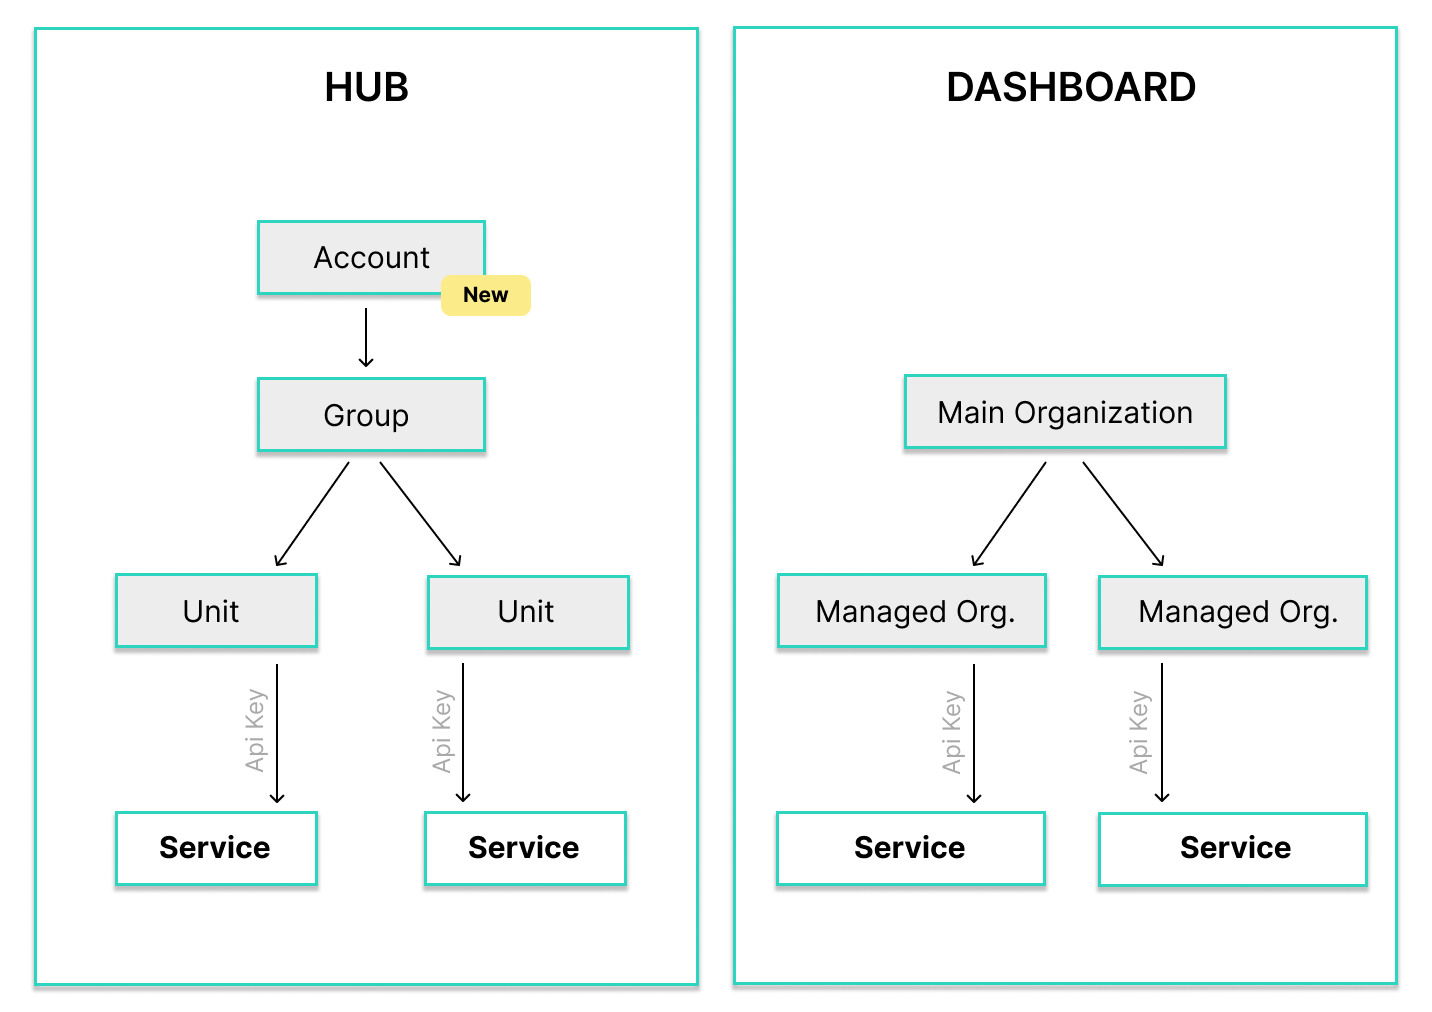
Organization
Your top-level entity in fiskaly. Managed organizations represent individual physical locations.
API Key & Secret
Credentials generated in HUB, used to authenticate all subsequent API requests.
Authentication
Use your API Key and Secret to generate an access token used in all further API calls.
TSS (Technical Security System)
The core signing component. Must be created, configured with an Admin PIN, and initialized.
Client
Represents a point-of-sale terminal or application that creates transactions against a TSS.
Transaction
A signed fiscal record. Once your TSS and Client are ready, you can create and sign transactions.
Take a look at our video walkthrough for a visual explanation of the setup process.
Prerequisites
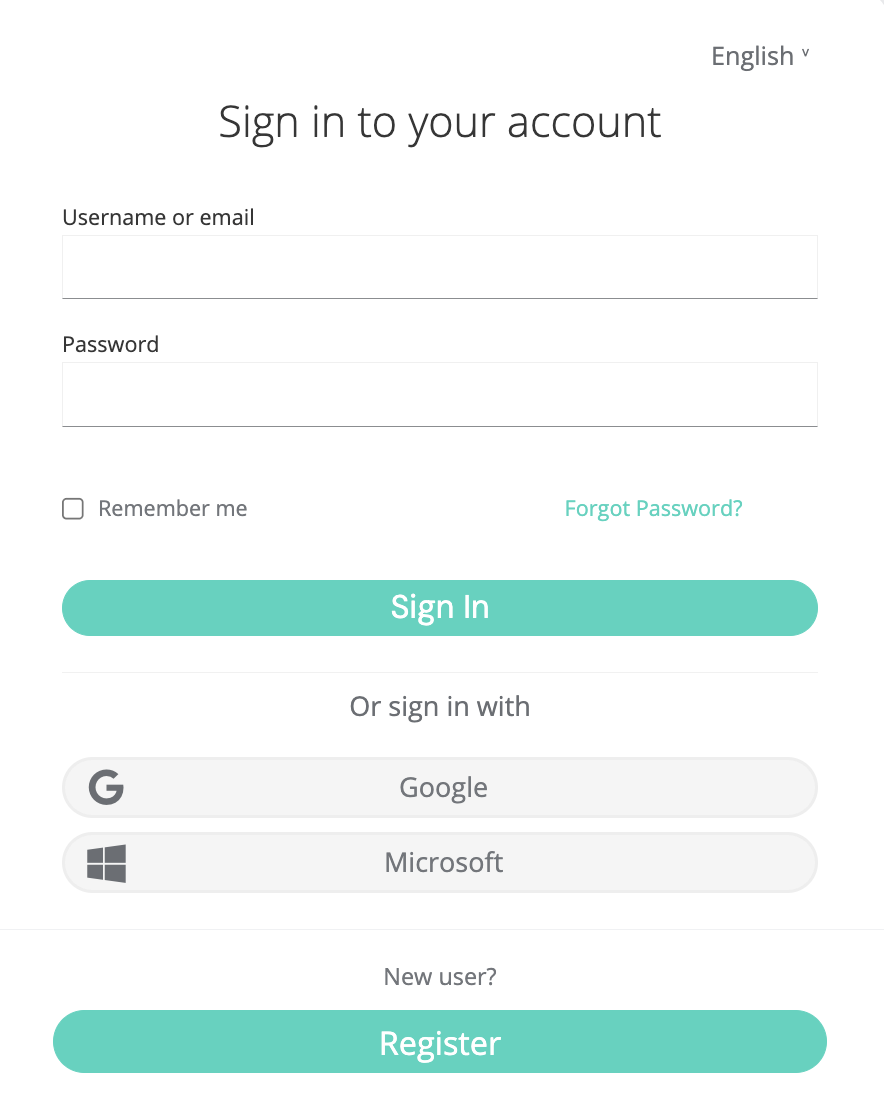
Section titled “Prerequisites”You need a fiskaly account and access to the fiskaly HUB. If you do not have an account yet, sign up here.
You will also need a tool to make HTTP requests — for example cURL (command line), Postman, or your own application code.
Step-by-Step Setup
Section titled “Step-by-Step Setup”Create an Organization
When you log into HUB for the first time, you are prompted to create an organization. This is your main organization, and all managed organizations are created beneath it.
Generally, each managed organization corresponds to a physical location (e.g. a store or restaurant).
 💡Not ready for production?
For testing purposes, you do not need to fill in all fields. You can leave the billing address empty and complete it later.
After creating your organization, HUB will show your current setup — initially with 0 TSS and 0 clients.
Generate an API Key and Secret
Navigate to the API Keys section in the fiskaly HUB and create a new API key.
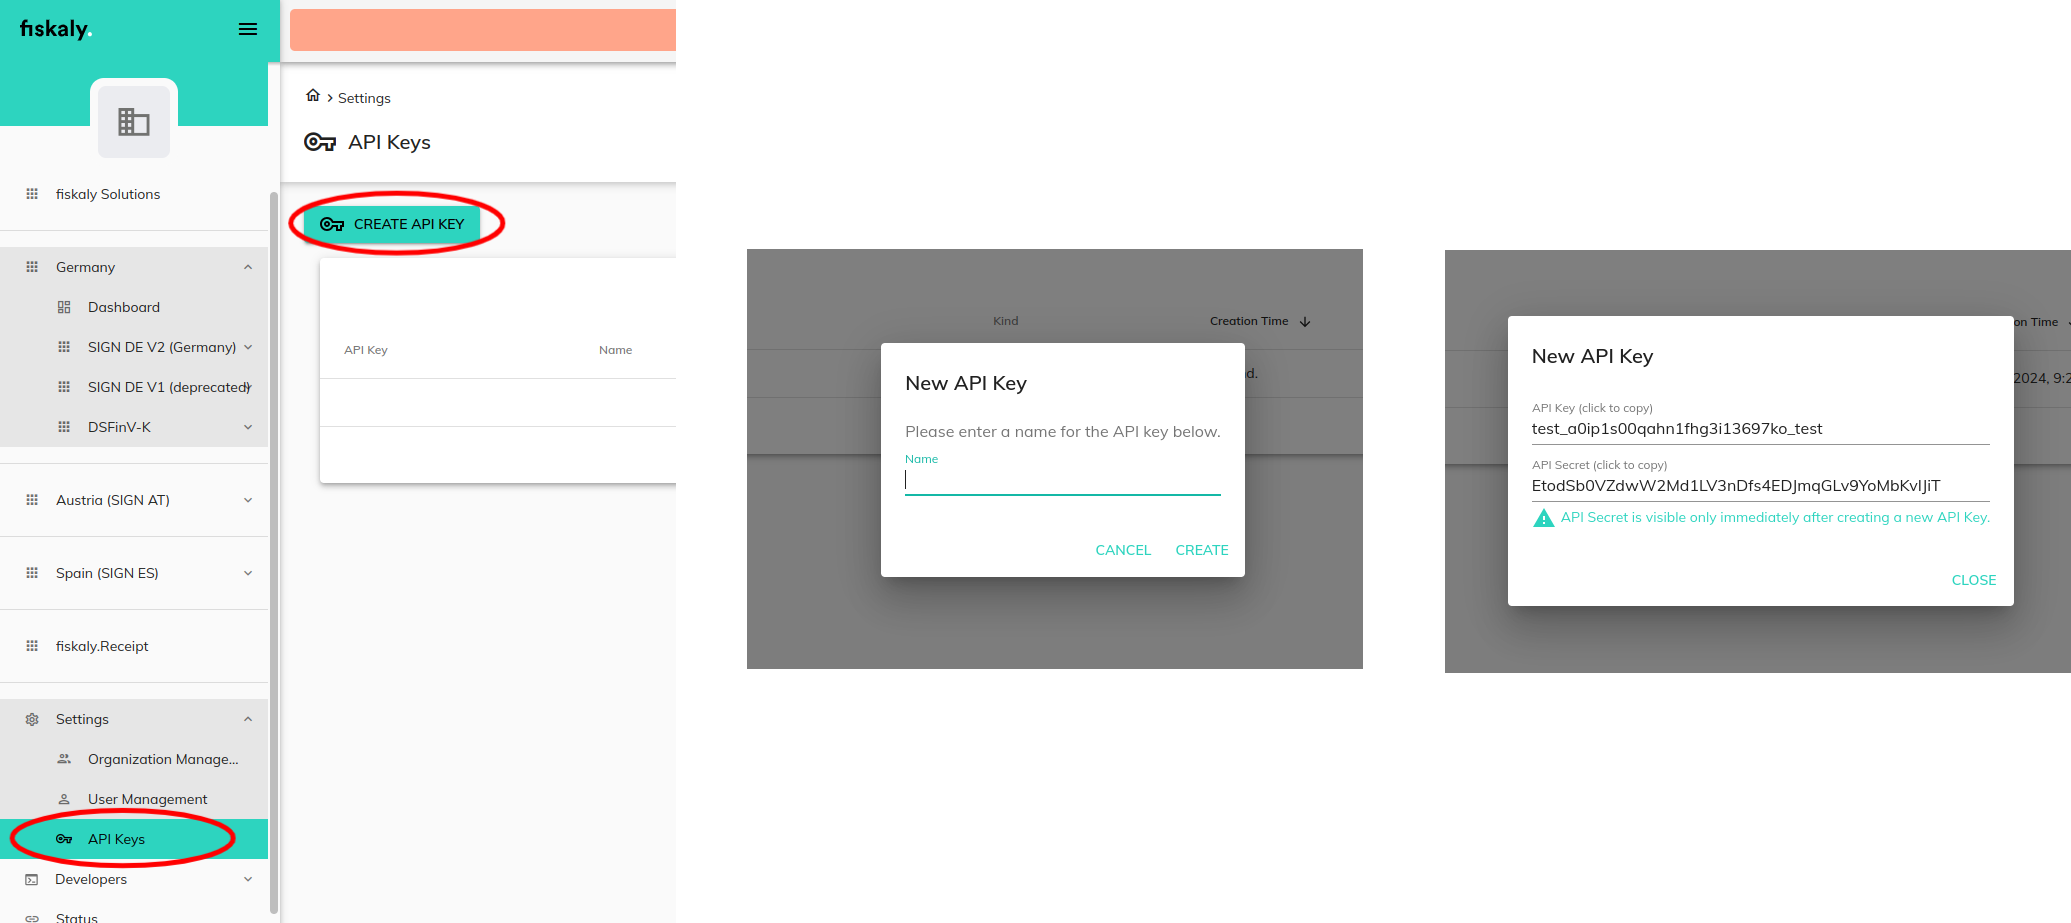
You will receive an API Key and API Secret. Save these securely — you will need them for all subsequent API requests.
⚠️Store your credentials safelyThe API Secret is only shown once. Make sure to copy and store it in a secure location before closing the dialog.
Our video tutorial demonstrates the process of generating an API key and secret.
Authenticate with the API
Use your API key and secret to obtain an access token. This token is required for all subsequent requests.
curl -X POST https://kassensichv-middleware.fiskaly.com/api/v2/auth \
  -H "Content-Type: application/json" \
  -d '{
    "api_key": "your_api_key",
    "api_secret": "your_api_secret"
  }'
const response = await fetch( "https://kassensichv-middleware.fiskaly.com/api/v2/auth", { method: "POST", headers: { "Content-Type": "application/json" }, body: JSON.stringify({ api_key: "your_api_key", api_secret: "your_api_secret", }), } ); const { access_token } = await response.json();Example response (200 OK)
{"access_token": "eyJhbGciOiJSUzI1NiIsInR5cCI6IkpXVCJ9...","access_token_claims": {"env": "TESTING","organization_id": "your-org-id"},"access_token_expires_in": 86400,"access_token_expires_at": "2026-03-02T12:00:00Z","refresh_token": "eyJhbGciOiJSUzI1NiIsInR5cCI6IkpXVCJ9...","refresh_token_expires_in": 172800,"refresh_token_expires_at": "2026-03-03T12:00:00Z"}The response contains an
access_tokenthat you must include as a Bearer token in theAuthorizationheader of all following requests.Create a TSS
Create a new Technical Security System (TSS) by sending a PUT request with a unique TSS ID (UUID).
TSS_ID=$(uuidgen)

curl -X PUT "https://kassensichv-middleware.fiskaly.com/api/v2/tss/${TSS_ID}" \
  -H "Authorization: Bearer ${ACCESS_TOKEN}" \
  -H "Content-Type: application/json" \
  -d '{
    "description": "My first TSS"
  }'
const tssId = crypto.randomUUID(); const response = await fetch( `https://kassensichv-middleware.fiskaly.com/api/v2/tss/${tssId}`, { method: "PUT", headers: { "Authorization": `Bearer ${accessToken}`, "Content-Type": "application/json", }, body: JSON.stringify({ description: "My first TSS", }), } );Example response (200 OK)
{"_id": "your-tss-id","_type": "TSS","_env": "TESTING","_version": 1,"admin_puk": "initial-puk-from-creation","state": "CREATED","certificate": "-----BEGIN CERTIFICATE-----\n...\n-----END CERTIFICATE-----","serial_number": "a1b2c3d4e5f6...","public_key": "BHxw...","signature_algorithm": "ECDSA","signature_timestamp_format": "ISO8601","transaction_data_encoding": "UTF-8","max_number_registered_clients": 100,"max_number_active_transactions": 1000,"time_creation": "2026-03-01T10:00:00Z","metadata": {}}After creation, you need to initialize the TSS. This involves three sub-steps:
a) Change the Admin PIN
The TSS is created in an
UNINITIALIZEDstate. You must set a new Admin PIN before initialization.curl -X PATCH "https://kassensichv-middleware.fiskaly.com/api/v2/tss/${TSS_ID}/admin" \ -H "Authorization: Bearer ${ACCESS_TOKEN}" \ -H "Content-Type: application/json" \ -d '{ "admin_puk": "initial-puk-from-creation", "new_admin_pin": "your-secure-admin-pin" }'await fetch( `https://kassensichv-middleware.fiskaly.com/api/v2/tss/${tssId}/admin`, { method: "PATCH", headers: { "Authorization": `Bearer ${accessToken}`, "Content-Type": "application/json", }, body: JSON.stringify({ admin_puk: "initial-puk-from-creation", new_admin_pin: "your-secure-admin-pin", }), } );b) Authenticate as Admin
curl -X POST "https://kassensichv-middleware.fiskaly.com/api/v2/tss/${TSS_ID}/admin/auth" \
  -H "Authorization: Bearer ${ACCESS_TOKEN}" \
  -H "Content-Type: application/json" \
  -d '{
    "admin_pin": "your-secure-admin-pin"
  }'
await fetch( `https://kassensichv-middleware.fiskaly.com/api/v2/tss/${tssId}/admin/auth`, { method: "POST", headers: { "Authorization": `Bearer ${accessToken}`, "Content-Type": "application/json", }, body: JSON.stringify({ admin_pin: "your-secure-admin-pin", }), } );c) Initialize the TSS
Update the TSS state to
INITIALIZED:curl -X PATCH "https://kassensichv-middleware.fiskaly.com/api/v2/tss/${TSS_ID}" \ -H "Authorization: Bearer ${ACCESS_TOKEN}" \ -H "Content-Type: application/json" \ -d '{ "state": "INITIALIZED" }'await fetch( `https://kassensichv-middleware.fiskaly.com/api/v2/tss/${tssId}`, { method: "PATCH", headers: { "Authorization": `Bearer ${accessToken}`, "Content-Type": "application/json", }, body: JSON.stringify({ state: "INITIALIZED", }), } );Example response (200 OK)
{"_id": "your-tss-id","_type": "TSS","_env": "TESTING","_version": 2,"state": "INITIALIZED","certificate": "-----BEGIN CERTIFICATE-----\n...\n-----END CERTIFICATE-----","serial_number": "a1b2c3d4e5f6...","public_key": "BHxw...","signature_algorithm": "ECDSA","signature_timestamp_format": "ISO8601","transaction_data_encoding": "UTF-8","max_number_registered_clients": 100,"max_number_active_transactions": 1000,"time_creation": "2026-03-01T10:00:00Z","metadata": {}}Create a Client
With the TSS initialized, create a client that represents your point-of-sale terminal or application.
CLIENT_ID=$(uuidgen)

curl -X PUT "https://kassensichv-middleware.fiskaly.com/api/v2/tss/${TSS_ID}/client/${CLIENT_ID}" \
  -H "Authorization: Bearer ${ACCESS_TOKEN}" \
  -H "Content-Type: application/json" \
  -d '{
    "serial_number": "POS-001"
  }'
const clientId = crypto.randomUUID(); const response = await fetch( `https://kassensichv-middleware.fiskaly.com/api/v2/tss/${tssId}/client/${clientId}`, { method: "PUT", headers: { "Authorization": `Bearer ${accessToken}`, "Content-Type": "application/json", }, body: JSON.stringify({ serial_number: "POS-001", }), } );Example response (200 OK)
{"_id": "your-client-id","_type": "CLIENT","_env": "TESTING","_version": 1,"serial_number": "POS-001","state": "REGISTERED","tss_id": "your-tss-id","time_creation": "2026-03-01T10:00:00Z","metadata": {}}Create a Transaction
Now you can create your first signed transaction. Transactions follow a lifecycle: start the transaction, then finish it.
a) Start the transaction
TX_ID=$(uuidgen)

curl -X PUT "https://kassensichv-middleware.fiskaly.com/api/v2/tss/${TSS_ID}/tx/${TX_ID}?tx_revision=1" \
  -H "Authorization: Bearer ${ACCESS_TOKEN}" \
  -H "Content-Type: application/json" \
  -d '{
    "state": "ACTIVE",
    "client_id": "your-client-id"
  }'
const txId = crypto.randomUUID(); const startResponse = await fetch( `https://kassensichv-middleware.fiskaly.com/api/v2/tss/${tssId}/tx/${txId}?tx_revision=1`, { method: "PUT", headers: { "Authorization": `Bearer ${accessToken}`, "Content-Type": "application/json", }, body: JSON.stringify({ state: "ACTIVE", client_id: clientId, }), } );Example response (200 OK)
{"_id": "your-tx-id","_type": "TRANSACTION","_env": "TESTING","_version": 1,"number": 1,"state": "ACTIVE","client_id": "your-client-id","client_serial_number": "POS-001","tss_id": "your-tss-id","tss_serial_number": "a1b2c3d4e5f6...","time_start": "2026-03-01T10:00:00Z","revision": 1,"latest_revision": 1,"log": {"operation": "START","timestamp": "2026-03-01T10:00:00Z","timestamp_format": "ISO8601"},"signature": {"value": "MEUCIQDx...","timestamp": "2026-03-01T10:00:00Z","timestamp_format": "ISO8601","serial_number": "a1b2c3d4e5f6..."},"metadata": {}}b) Finish the transaction
curl -X PUT "https://kassensichv-middleware.fiskaly.com/api/v2/tss/${TSS_ID}/tx/${TX_ID}?tx_revision=2" \
  -H "Authorization: Bearer ${ACCESS_TOKEN}" \
  -H "Content-Type: application/json" \
  -d '{
    "state": "FINISHED",
    "client_id": "your-client-id",
    "schema": {
      "standard_v1": {
        "receipt": {
          "receipt_type": "RECEIPT",
          "amounts_per_vat_rate": [
            {
              "vat_rate": "NORMAL",
              "amount": "10.00"
            }
          ],
          "amounts_per_payment_type": [
            {
              "payment_type": "CASH",
              "amount": "10.00"
            }
          ]
        }
      }
    }
  }'
const finishResponse = await fetch( `https://kassensichv-middleware.fiskaly.com/api/v2/tss/${tssId}/tx/${txId}?tx_revision=2`, { method: "PUT", headers: { "Authorization": `Bearer ${accessToken}`, "Content-Type": "application/json", }, body: JSON.stringify({ state: "FINISHED", client_id: clientId, schema: { standard_v1: { receipt: { receipt_type: "RECEIPT", amounts_per_vat_rate: [ { vat_rate: "NORMAL", amount: "10.00" }, ], amounts_per_payment_type: [ { payment_type: "CASH", amount: "10.00" }, ], }, }, }, }), } );Example response (200 OK)
{"_id": "your-tx-id","_type": "TRANSACTION","_env": "TESTING","_version": 2,"number": 1,"state": "FINISHED","client_id": "your-client-id","client_serial_number": "POS-001","tss_id": "your-tss-id","tss_serial_number": "a1b2c3d4e5f6...","time_start": "2026-03-01T10:00:00Z","time_end": "2026-03-01T10:05:00Z","revision": 2,"latest_revision": 2,"schema": {"standard_v1": {"receipt": {"receipt_type": "RECEIPT","amounts_per_vat_rate": [{ "vat_rate": "NORMAL", "amount": "10.00" }],"amounts_per_payment_type": [{ "payment_type": "CASH", "amount": "10.00" }]}}},"qr_code_data": "V0;955002-00;Kassenbeleg-V1;...","log": {"operation": "FINISH","timestamp": "2026-03-01T10:05:00Z","timestamp_format": "ISO8601"},"signature": {"value": "MEUCIQDx...","timestamp": "2026-03-01T10:05:00Z","timestamp_format": "ISO8601","serial_number": "a1b2c3d4e5f6..."},"metadata": {}}The response includes the signed transaction data with a cryptographic signature from the TSS.
Log Out the Admin
After completing the setup, log the Admin user out of the TSS.
curl -X POST "https://kassensichv-middleware.fiskaly.com/api/v2/tss/${TSS_ID}/admin/logout" \
  -H "Authorization: Bearer ${ACCESS_TOKEN}"
await fetch( `https://kassensichv-middleware.fiskaly.com/api/v2/tss/${tssId}/admin/logout`, { method: "POST", headers: { "Authorization": `Bearer ${accessToken}`, }, } );
This entire sequence of requests can be integrated into a “one-click” provisioning solution that requires no manual user interaction. The implementation details are up to you.
Postman Collection
Section titled “Postman Collection”You can also run through these requests using Postman. Download the collection and environment files to get started quickly:
Download Postman Collection
Download Postman Environment
See the Postman tutorial for detailed instructions.
Next Steps
Section titled “Next Steps”Was this page helpful?