fiskaly HUB is organized around a collapsible navigation panel on the left that gives you quick access to your organizations, products, API keys, and account settings. You can collapse the sidebar to icon-only view at any time by clicking the toggle at the center of the panel. This guide walks you through each section of the interface so you can find what you need and manage your setup efficiently.
HUB Menu
Navigate the left panel and service shortcuts
Home screens
Explore and Operate modes per org level
Organization Management
Accounts, Groups, Units and how to create them
Account Management
Company details, plans, usage, billing, and invoices
Organization details
Edit Group/Unit details and upload a logo
API Keys
Create and manage API credentials per environment
User Management
Invite users and manage access to your organizations
Language & Help
Supported languages and help menu shortcuts
HUB menu
Section titled “HUB menu”The HUB sidebar is organized into five sections: Organization card, Navigation, Services, Management, and User profile.
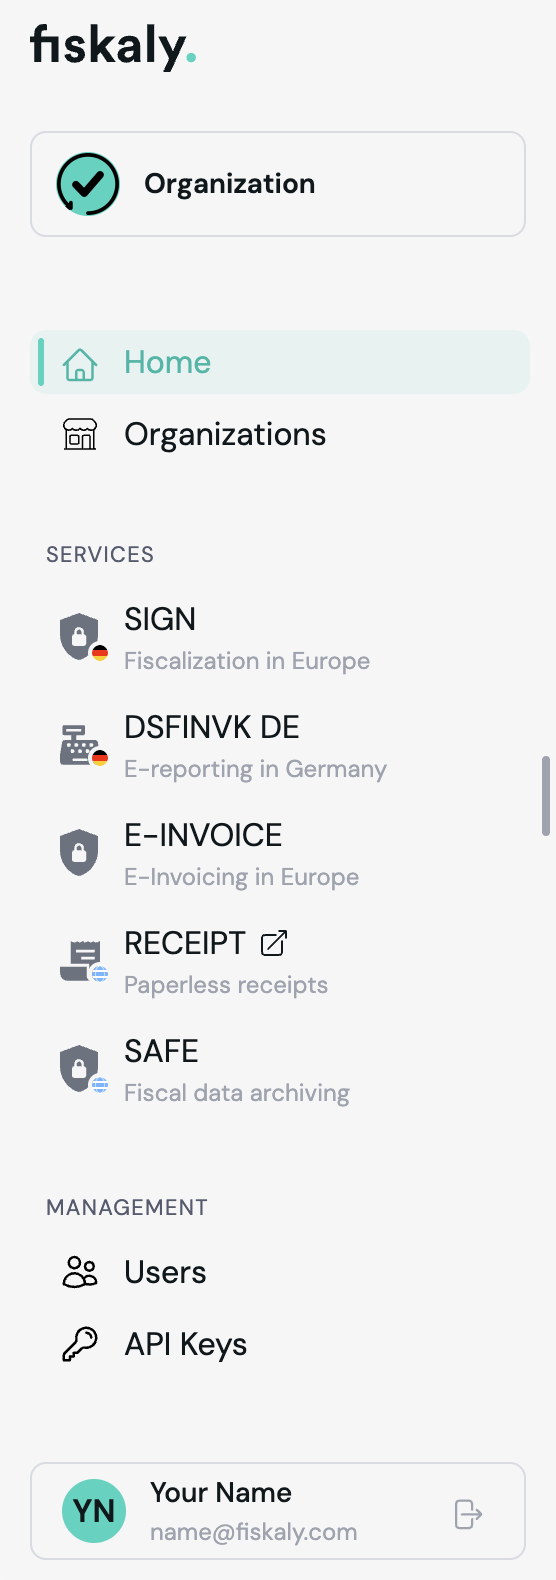
Home screens
Section titled “Home screens”After login, HUB launches with a home screen that visualizes the most relevant information for your account:
- Stats cards for your service usage
- Quick links to the most relevant actions in HUB
- Recent events in your account and news & updates from fiskaly
Organization management
Section titled “Organization management”HUB uses a clear three-level hierarchy, which compares to the legacy Dashboard as follows:
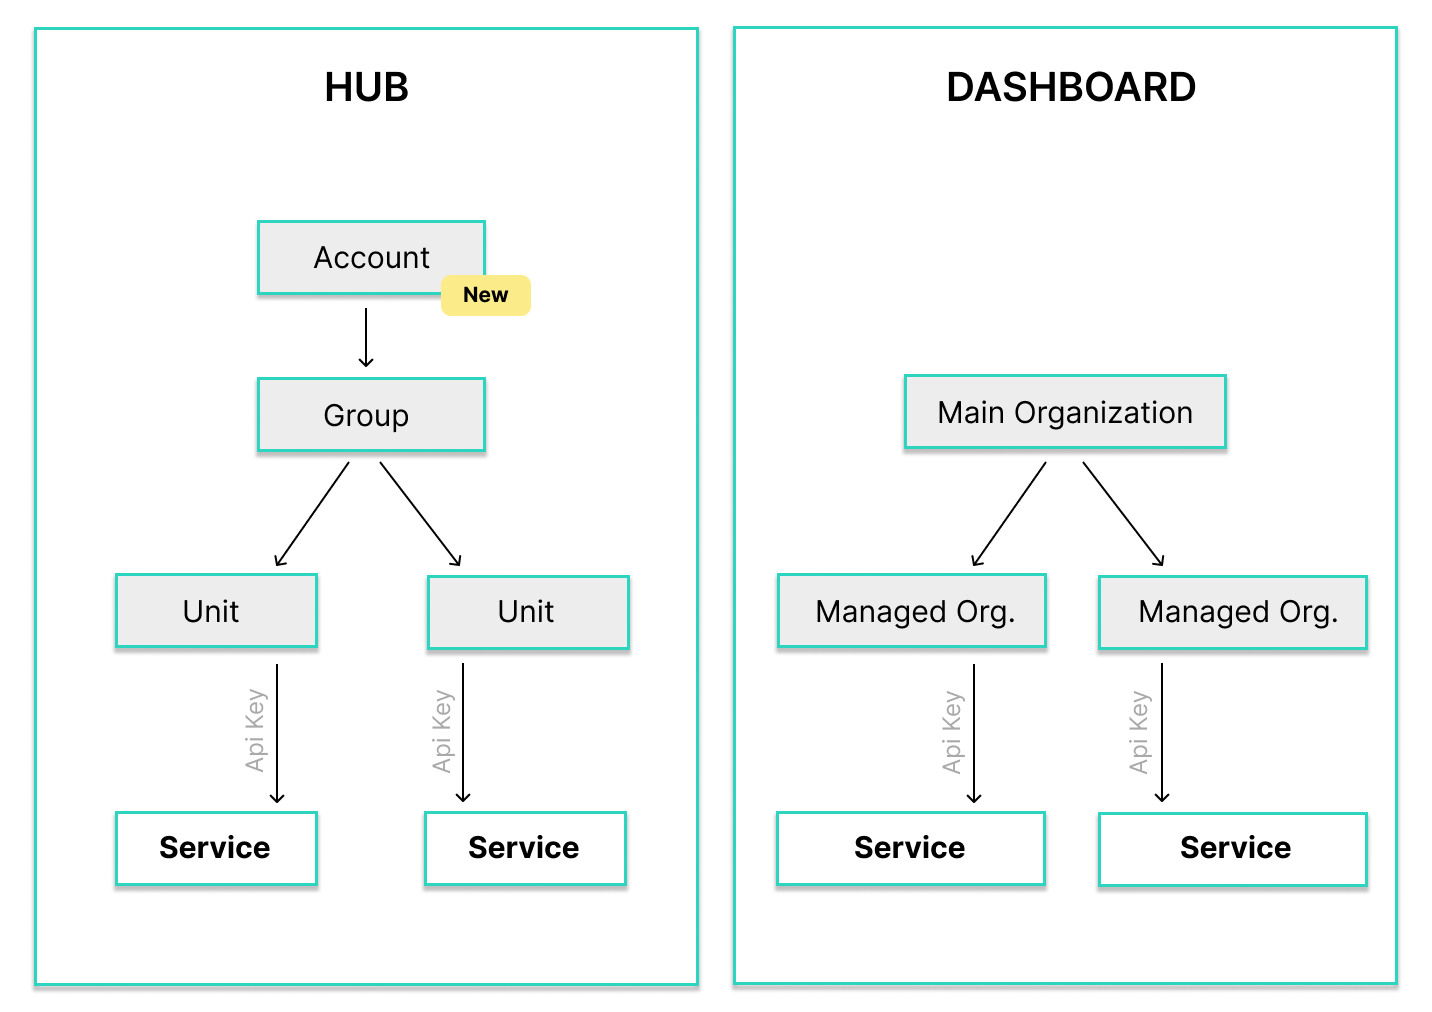
- Account - The top-level structure in fiskaly HUB
- Group - An intermediate layer for organizing Units into logical clusters, scalable to structuring needs
- Unit - A single legal entity or merchant (Taxpayer) operating within a Group
A Unit is always dependent on its Account and cannot contain other Units. An Account cannot be a sub-organization of another organization.
Create organizations
Section titled “Create organizations”Creating organizations is free. While creating a new organization, its position within your organizational hierarchy is shown on the left. After creation, each organization can be edited as needed.
Create a Group
- In the organization selector within your Account structure, click ”+ Create group”.
- Enter the group name and display name.
- Click “Save”.
- The new Group is displayed automatically.
Create a Unit
- In the organization selector within your Account structure, click ”+ Create Org. Unit”.
- Enter the unit name and display name.
- Click “Save”.
- The new Unit is displayed automatically.
If no LIVE environment has been activated, all initial organizations are created in the TEST environment, which allows you to safely experiment, test integrations, and configure your setup without affecting real data or triggering fiscal actions. This helps you identify and fix errors early, so you can validate your structure before switching to the LIVE environment.
The LIVE environment is separate from TEST, and fiscalization-relevant resources created within a Unit in TEST cannot be transferred to LIVE. To create LIVE resources, you need to enable the LIVE environment and use a LIVE API Key with the relevant fiskaly APIs.
When creating an organization from the LIVE environment, it will be available in both the LIVE and TEST environments. However, if you create it from within the TEST environment, it will only exist in TEST.
Switch organizations
Section titled “Switch organizations”Your currently selected organization will be displayed on the HUB’s organization card on the left and in the header. Click it to return to the organization selector or to view the recently viewed organizations.
Organization selector
Section titled “Organization selector”Each organization comes with dedicated options and provides an overview with further details and products. To access them, simply click the corresponding organization in the organization selector.
Accounts
The “What’s New” section provides service maintenance notices, API release updates, and product news tailored to the information you provided earlier.
Groups
You can manage existing Units, quickly create new ones, invite new users, and generate API Keys to integrate services into your system.
Units
You get an at-a-glance view of all API Keys and users belonging to the Unit, as well as administrator details and additional available products.
The overview of activated solutions is customizable, enabling you to display solutions across multiple countries.
Account management
Section titled “Account management”The Account section provides access to your company details and billing information. It is accessible from the organization card when viewing an Account-level organization. For more details, see the Account Management page.
Organization details
Section titled “Organization details”Groups and Units have a dedicated Detail page where you can view and edit the organization’s details. To open it, click the organization card at the top of the sidebar.
What you can view and edit:
- Organization name and display name
- Address (street, city, country)
- Organization logo
API Keys management
Section titled “API Keys management”The API Key section is accessible from the compact navigation menu. It displays all existing API Keys and provides the option to create new ones by selecting “Create API Key” and assigning a name, as well as to remove existing Keys.
Each API Key is linked to a specific organization (Group or Unit) and to the selected environment. An API Key created in the TEST environment can only be used to create resources for testing, while an API Key created in the LIVE environment can only be used to create LIVE resources.
User management
Section titled “User management”The user management section, accessible from the compact navigation menu, lets you view all users in your organization, invite new members, assign roles, and remove users. For full details, see the User Management page.
Language and Help
Section titled “Language and Help”HUB is available in English, German, Spanish, Italian, and French. You can switch the interface language at any time using the language selector in the top navigation bar.
The top navigation also provides a Help menu with quick access to:
- Developer documentation
- Contact Support
- Support Center
- System Status
- Changelog